I have made some progress, i think i have enough parts to assemble the printer to a point where it will print some plastic YAY...
Last night and yesterday i completed the heated bed and 1/3rd of the hotend for the exxtruder, i have decided that it makes sense to get the hotend made up on a CNC mill/lathe.
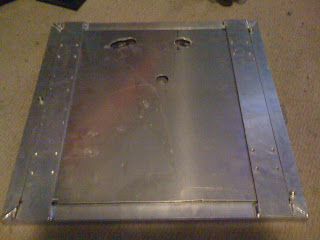
Doesn't look like much at all does it? lets look whats hiding below.
At the top of this image you can see the bottom of the bed, this is what mounts onto the linear bearings. the bottom section is the underside of the top.
this is the underside of the bottom of the bed, you can see the two straps with the holes for the linear bearings.
here you can see the M6 Allen key bolts that i have used as adjustment screws that level the print bed. these mate with some M6 Nutserts that i have place in the 3mm heat spreading plate that the glass sits on.
here you can see where i went a little nuts on the punch in my mates workshop, this is to allow access to the terminals for the heating element. this is 240v AC, need to make sure this frame is earthed and not touching the active or neutral lines...
here are the parts for the prototype hotend. this is only 1/3rd of the parts you need. you need 3 x all the parts you see here.. 6mm OD,5mmID x12mm brass tube, 2x M3 x 30mm screws, Nozzle and 4r7 3watt RWM series resitstor, you can see in this shot the hole on the left has a thread cut 10mm deep for the nozzle to mount.
here you can see the PTFE mounting block.
Then press the brass tube sections into the 6mm hole, one from each end, this does two things, it makes sure that the maximum surface area is contact with metal and allows easier replacement if/when the resistor dies. the reason its in two pieces is the resistors when you get them are not uniform in their diameter, so the two pieces allow enough movement to ensure it is held tight with no adhesives. when this resitor dies, knock out the old one with your calibrated hammer and replace withe new resistor and tubes if needed...
NextI screwed in the brass nozzle, to do this i cut a slot in the top of it for a flat blade screwdriver.
here you can see the hot end assembled for testing, i have placed a thermistor inside the nozzle where the filament would normally go, this is the green and white wire.. so i applied 12volts onto the resistor and watched the results..
after a little wait (2mins) the temp reading was 200'c after another min it was @ 270'c
so i think tonight if i dont find something more interesting to play with i will mount the thermistor to the bed and wire that up an then consider mounting the hotend to the extruder and see if i can make worms of plastic.. this nozzle only has a .55mm hole as all my smaller drill bits were snapped and i am yet to have more 0.25 or 0.3mm drills arrive...


No comments:
Post a Comment